Automate SSIS 2012 Project Deployment and Configuration Management using PowerShell – Part 2

Continuing Automate SSIS 2012 Project Deployment and Configuration Management using PowerShell – Part 1

Download SSISProject containing:

  1. DeploymentDemo SSIS Project
  2. SimpleSSISDeploy.ps1

Step 2: Add Parameters.xml to the SSIS Project

Before SQL Server 2012, configuration data for SSIS package such as server names, database names, and SMTP servers can be stored in XML files, environment variables, or a separate configuration database. With the new Parameters feature of SSIS catalog, managing configuration data across your environments has never been so intuitive. Instead of  updating a database or a cryptic XML file, someone could simply login to the SSIS catalog via SSMS and configure parameter values manually. Although configuring an SSIS project directly in Production may seem convenient and give anyone a demi-God feeling, it is, however, very risky and is prone to human error.

To continuously integrate our SSIS project, we can automate the task of updating parameter values after the *.ispac is successfully deployed. To do that, we will use an input file, Parameters.xml, to tell our PowerShell script what value to set each parameters with depending on which environment it is deploying to. We will add this file within the SSIS Project itself, so that

  1. It is under source control
  2. Developers will be reminded to prepare it before deployment and
  3. We have all the information we need to execute our SSIS project in one location

Enough of the intro, here’s exactly what you need to do:

  1. Create a Parameters.xml file under the SSIS Project root folder (same folder as *.dtproj file). Paste the code below:
    
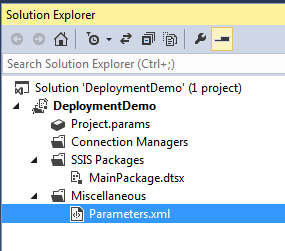
    <SSIS>
        <Development>
            <ProjectParameters>
                <Parameter Name="InitialCatalog">AdventureWorksDWH2012</Parameter>
                <Parameter Name="ServerName">SQLSSISDEV</Parameter>
            </ProjectParameters>
            <Packages>
                <Package Name="MainPackage.dtsx">
                    <Parameters>
                        <Parameter Name="SourceFolderRelativePath">\\Source\Folder\RelativePath</Parameter>
                        <Parameter Name="LogFileName">MainPackage.log</Parameter>
                    </Parameters>
                </Package>
            </Packages>
        </Development>
        <Acceptance>
          <ProjectParameters>
            <Parameter Name="InitialCatalog">AdventureWorksDWH2012</Parameter>
            <Parameter Name="ServerName">SQLSSISACC</Parameter>
          </ProjectParameters>
          <Packages>
            <Package Name="MainPackage.dtsx">
              <Parameters>
                <Parameter Name="SourceFolderRelativePath">\\Source\Folder\RelativePath</Parameter>
                <Parameter Name="LogFileName">MainPackage.log</Parameter>
              </Parameters>
            </Package>
          </Packages>
        </Acceptance>
        <Production>
          <ProjectParameters>
            <Parameter Name="InitialCatalog">AdventureWorksDWH2012</Parameter>
            <Parameter Name="ServerName">SQLSSISPRD</Parameter>
          </ProjectParameters>
          <Packages>
            <Package Name="MainPackage.dtsx">
              <Parameters>
                <Parameter Name="SourceFolderRelativePath">\\Source\Folder\RelativePath</Parameter>
                <Parameter Name="LogFileName">MainPackage.log</Parameter>
              </Parameters>
            </Package>
          </Packages>
        </Production>
    </SSIS>
    
    
  2. Add Parameters.xml file as an existing item to the SSIS Project. It will automatically be placed under Miscellaneous folder.

    Parameters

Next: Automate SSIS 2012 Project Deployment and Configuration Management using PowerShell – Part 3

Automate SSIS 2012 Project Deployment and Configuration Management using PowerShell – Part 1

Let’s start this by describing the scenario with which the approach described below will be useful to you:

  1. You are using SQL Server 2012/2014
  2. You have a separate server/instance for each staging environment (Development, Acceptance, Production, etc.)
  3. You would like to automate SSIS project deployments to your target environments
  4. You would like to automate managing SSIS package configurations (e.g. server names, database names, etc.) on all environments without using a separate configuration database

If you nod your way through the 4 points above, then take the time to read my solution below. It’s long, but I promise you will find some points mentioned helpful if not the entire thing.

Pre-requisites

I assume that you are familiar with the new Project Deployment Model feature of SSIS 2012/2014. You should also understand how Parameters are utilized with an SSIS Project. You should not be afraid of PowerShell and XML, for neither of them bite and both are very easy to learn. Note that I am not going to use the new Environment Variables feature because it assumes that all environments are deployed to a single server  – which is not the usual case for enterprises or any medium to large scale company for that matter.

The Solution in Summary

My solution has 3 components:

  1. PowerShell script that deploys an *.ispac file to an SSIS Catalog and updates Project and Package Parameters
  2. SSIS Project build configuration to store the SSIS Catalog information
  3. Additional XML file within the SSIS project to store parameter values

Download SSISProject containing:

  1. DeploymentDemo SSIS Project
  2. SimpleSSISDeploy.ps1

Step 1: Setup the SSIS Project’s Build Configuration

We will store the target SSIS Catalog information in the SSIS Project itself so that our script can find on its own where to deploy the *.ispac file. To do that, open the SSIS project then..

  1. In Solution Explorer, right-click on the Visual Studio solution and click Properties.
  2. Solution Property Page dialog opens.
  3. Under Configuration Properties, select Configuration.
  4. Click Configuration Manager at the upper right corner of the window. Configuration Manager dialog opens.
  5. Click the dropdown list under Active solution configuration.
  6. Select New. New Solution Configuration dialog opens.
  7. In the Name field, enter one of your environments. Check “Create new project configurations”. Click OK.
  8. Repeat steps 4 – 6 until you have created solutions and project configurations for all  your environments.
  9. Click Close. Click OK.

Now, we are ready to fill our build configuration for each environment.

  1. In Solution Explorer, right-click on the SSIS project and click Properties. 
  2. Propert Page dialog opens.
  3. Under Configuration Properties, click Deployment. Configuration dropdown is now enabled.
  4. Select one environment created earlier.
  5. In the main pane under Deployment Model (Project), fill the Server Name and Server Project Path details. Click Apply.
  6. Repeat steps 4 – 5 for all environments. Click OK to close the Property Pages window.

Finally, open the folder containing the SSIS project and locate .dtproj.user file. If you can’t see it, modify Folder Options to see the hidden files. The file should look like this:


<?xml version="1.0" encoding="utf-8"?>
<DataTransformationsUserConfiguration xmlns:xsi="http://www.w3.org/2001/XMLSchema-instance" xmlns:xsd="http://www.w3.org/2001/XMLSchema">
 <Configurations>
   <Configuration>
     <Name>Development</Name>
<options>
       <ServerName>SQLSSISDEV</ServerName>
       <PathOnServer>/SSISDB/LAB/DeploymentDemo</PathOnServer>
       <UserIDs />
       <UserPasswords />
       <OfflineMode>false</OfflineMode>
       <ProgressReporting>true</ProgressReporting>
       <ParameterConfigurationSensitiveValues />
     </Options>
   </Configuration>
   <Configuration>
     <Name>Acceptance</Name>
<options>
        <ServerName>SQLSSISACC</ServerName>
        <PathOnServer>/SSISDB/LAB/DeploymentDemo</PathOnServer>
        <UserIDs />
        <UserPasswords />
        <OfflineMode>false</OfflineMode>
        <ProgressReporting>true</ProgressReporting>
        <ParameterConfigurationSensitiveValues />
      </Options>
  </Configuration>
  <Configuration>
     <Name>Production</Name>
<options>
        <ServerName>SQLSSISPRD</ServerName>
        <PathOnServer>/SSISDB/LAB/DeploymentDemo</PathOnServer>
        <UserIDs />
        <UserPasswords />
        <OfflineMode>false</OfflineMode>
        <ProgressReporting>true</ProgressReporting>
        <ParameterConfigurationSensitiveValues />
      </Options>
  </Configuration>
 </Configurations>
</DataTransformationsUserConfiguration>

Next: Automate SSIS 2012 Project Deployment and Configuration Management using PowerShell – Part 2

Deploy a SQL Server Analysis Services Project using PowerShell

Step 1: Build SQL Server Analysis Services solution using devenv /build, for example

“<path>\devenv.com” AdventureWorksSSAS.sln /build Development

In the bin folder of your solution, you should find <projName>.asdatabase, <projName>.deploymentoptions, <projName>.deploymenttargets and <projName>.configsettings XML files

Step 2: Generate XMLA script using Microsoft.AnalysisServices.Deployment.exe

Microsoft.AnalysisServices.Deployment.exe <path>\AdventureWorksSSAS.asdatabase /s:GenerateXmla.log /o:SSASDatabase.xmla

Step 3. Execute XMLA on target server using PowerShell script.

[System.Reflection.Assembly]::LoadWithPartialName(“Microsoft.AnalysisServices.AdomdClient”)

# Read the target server from .deploymenttargets file generated in Step 1

$DeploymentTargetsFile = <path to <projName>.deploymenttargets>

$deploymentTargets = [xml](Get-Content $DeploymentTargetsFile)

# Connect to the server
$serverName = “Data Source=” + $deploymentTargets.DeploymentTarget.Server
$conn = New-Object Microsoft.AnalysisServices.AdomdClient.AdomdConnection $serverName
$conn.Open()

# Read XMLA
$xmla = Get-Content $XmlaPath

# Execute XMLA
$cmd = New-Object Microsoft.AnalysisServices.AdomdClient.AdomdCommand $xmla, $conn
return $cmd.ExecuteNonQuery();

And that’s it 🙂